Black Friday Sale: you will receive 25% off your purchase of $15 or more using the check out code: 25UTHM
Cyber Monday Sale: receive 15% off your purcahse of $15 or more by using uthm1528
And now the Curly Butter Braid Out....
Read more »
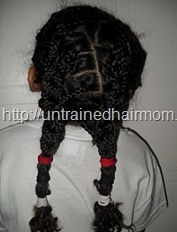
I made a zigzag part down the middle of her head, stopping about halfway to add a pony tail in the back.
I put 2 braids in each of the 2 ponytails on the side, just to have a variation of the standard braided pigtail do. The next day I switched out the accessories. She wore this style for 2 days.
D wanted to share a picture of the Tinker Bell nails she put on all by herself:
These “press on” nails definitely did not last as long as the hair style did, they never do!
This is a great summer style, because the nature of the buns protect the hair, especially the ends, from the sun and water if there is swimming involved. D’s hair had been washed, detangle and moisturized with Bee Mine Luscious Moisturizer prior to styling. To create this look, I started by parting down the middle then parting out the sections in the front I wanted to cornrow. I made 2 ponytails, putting each in 2 braids.
I then twisted the braids into buns and secured them with cloth bands and added scrunchies over each bun. Lastly, I did the 2 cornrows in front along her hair line…now my cornrows aren’t perfect, lol, I am still working on those.
She wore it like this for a day, then I added the front braids to her buns and she wore it that way for several days.
If you enjoyed this post, please “like” it!
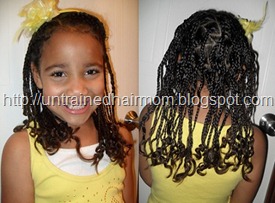
Protective styles are important for healthy hair; they reduce breakage, damage and shield the hair from the sun and weather. Some examples of protective styles would be box braids, twists, cornrows, buns, etc., with no rubber bands or beads. Most everyone in the hair care blogosphere is probably aware of the month long protective style challenge hosted by Beads, Braids & Beyond that recently took place and I wanted to share our protective style(s) with everyone. We chose to do small box/triangle/diamond braids, they are easy and versatile. I worked on them off and on for 2 days, starting on clean, detangled, well moisturized hair. I used Bee Mine Luscious Moisturizer all over, Bee Mine Curly Butter on each section before braiding, and Kinky-Curly Curling Custard on the ends as I finger curled them:
The braids lasted over 2 weeks, that is the longest amount of time a style has ever lasted for us!!! I changed up the look of her braids several ways during these two weeks. First, we simply added a headband (from Ni’s Ebony Curls Spot):
She participated in her school’s track meet, so I put her braids in 2 french braids to keep it out of her face:
Then we had a french braid out, adding another cute headband for some flare (this headband was purchased locally):
After the first week, they were still looking great. I washed her hair using a liquid castile hair wash from the Created by Nature line, her hair was still soaking wet in this photo:
Two cornrows in the front and a sock bun for her dance recital:
Here is another way we gave the style a different look, using only the cloth Goody ponytail holders, I put the top half up in two ponytails:
I had to attempt a variation of my favorite styles, the faux hawk:
They had been in for 2 weeks at this point, a little unraveling of the ends and fuzzy at the top, but not too bad:
She sported them in a ponytail for a couple more days while she was at her grandmas (with lots of swimming and not much care) and then they were taken down (I’ll make a post on the takedown process). Throughout these 2 1/2 weeks, I washed her hair twice, and moisturized daily with Bee Mine Luscious, really focusing on the ends.
Ok, I would really like your feedback, which style from this post was your favorite? Also, how often do you do protective styles on your/your child's hair?
If you enjoyed this post, please “like” it, tweet it, +1 it or Stumble it!
If you enjoyed this post, please "like" it, tweet it, +1 it or Stumble it!
How it's done:
After washing, detangling and moisturizing; I parted out a circle, starting approximately 1 1/2 inches out from Ds hairline. I clipped the remaining hair in the center out of the way. And began parting squares and making ponytails all the way around using Bee Mine Curly Butter on each section. As always, I had previously soaked the rubber bands in extra virgin olive oil. Once I had all the ponytails done I split each one in two sections and braided them. When that was done I parted out a second circle and clipped the rest of the hair out of the way. The squares in this round are parted off center to the ones in the first round. I then started adding the braids to these squares in a veil style fashion. I continued doing this all the way around.
Once I finished that, I gathered the braids and remaining hair into a single ponytail and braided the hair that hadn't been braided yet in small braids matching the other braids in size. And vio-la!
I hope you all enjoyed this weeks "Shappin" Style! For all of our new followers who don't know the story behind the title: Shappin' is a word D made up meaning cute/stylish/fashionable/cool and I post a new "Shappin" style every Saturday! Be sure to tune in!
If you enjoyed this post, please "like" it, tweet it, +1 it, or Stumble it!
untrainedhairmom Copyright © 2012 Fast Loading -- Powered by Blogger